Saturday, October 25, 2014

Perfectly Spooky Potatoes - Roasted Potato Medley


It is that time of year again: beautiful fall decorations, Halloween costumes, festivals, and CANDY! Halloween candy is pretty awesome, and if you are like us - if we buy it too early - piece-by-bite-sized-piece, it is gone by the time the first trick-or-treater arrives. 

Trying to balance our candy consumption with healthy eating choices, we made these potatoes as a side dish, and they were a compromise between me and my husband. He really likes the little purple potatoes, but I like sweet potatoes better. They are both really good for you and richer in nutrients than basic white potatoes. So we combined the two. If you have a picky eater, feel free to add a yukon gold potato, or the small red skinned potatoes and just cut them up like you do the others.  

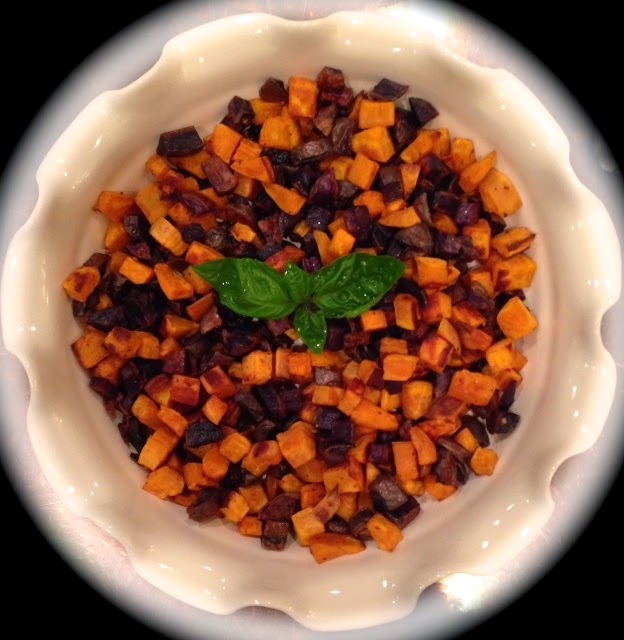
After roasting, these potatoes have a great Halloween look, and would be a fun way to eat healthy this week. They are simply delicious just as they are, or dipped in/topped with ranch dressing, greek yogurt, ketchup, or just about anything.  

We have a tendency to make more than we will eat, because the leftovers are wonderful reheated, or turned into hash browns for breakfast.  
I hope you get a chance to try these this week. Let me know if you have any questions and what you think about the yummy results! 

ROASTED POTATO MEDLEY - FALL FUN

2 Sweet Potatoes, Peeled
8 Purple Potatoes
2 Tablespoons Olive Oil
Salt and Pepper to taste

Preheat oven to 425
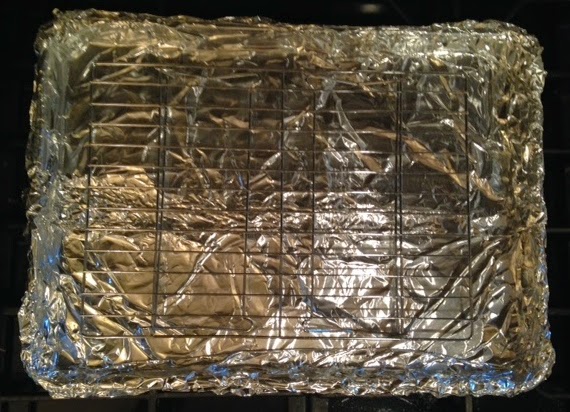
Cover baking sheet in aluminum foil (for easy clean up)
Spray foil-covered baking sheet with cooking spray (such as Pam)
Dice all potatoes into 1/2 inch pieces (Helpful hint ... the smaller you cut them, the less time they take to cook. The idea is to cut pieces that have about the same volume) Don't worry if some of the pieces are a little bit smaller - they will be the crispy ones!
Place the diced potatoes into a large bowl and add 1 Tablespoon of the olive oil, sprinkle with salt and pepper, and stir to coat. Repeat with the 2nd Tablespoon of olive oil and salt and pepper and stir, making sure that there is a nice, light coating but not so much that there is oil pooling in the bottom of the bowl. (HH - If you have an olive oil "spray" type dispenser, this is a great use for it!)
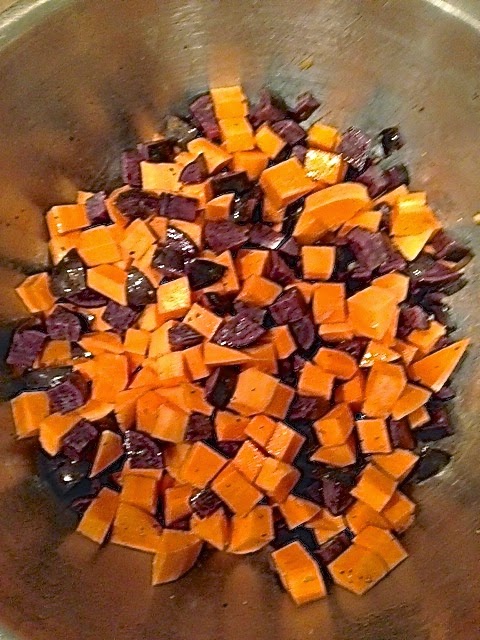
Cubes of Sweet Potatoes and Purple Potatoes
Spread the coated potatoes evenly on the foil-lined baking sheet (lightly spray the foil with cooking spray).  If they are lumped together they will not roast, but will steam and be gooey. If your baking tray is small, or you doubled the recipe, simply use a second baking sheet or roast a second batch. (If you use a second baking tray, just rotate the trays halfway through cooking).

Spread the potatoes on the foil lined baking sheet
Bake in the 425 degree oven for 20 minutes. 
Remove from oven and check for doneness, looking for edges that are starting to brown.  
Use a spatula to gently turn over (No biggie if they are not all turned over)
Return them to the oven and check at 5-minute intervals as baking time will vary.
  
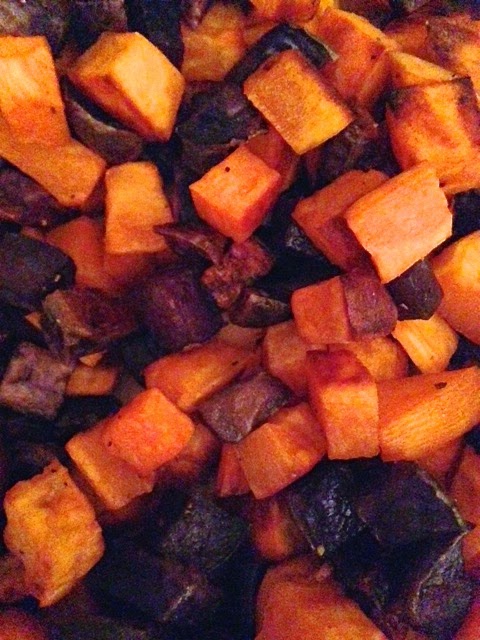
Delicious roasted potatoes, perfect for a fall evening side dish!
If you are lucky enough to have leftovers, fry them in a pan for hash browns for breakfast.


Thursday, October 23, 2014

Crispy Baked Chicken...Shocked and Amazed!

No frying, 3 ingredients, crispy outside, juicy inside.
PUT THE ROTISSERIE CHICKEN DOWN.
You know those recipes that you know are too good to be true? This is not one of them. I was fully prepared to write this one off if it didn't work - but I just found a secret that makes a beautiful baked chicken with crispy skin and doesn't involve some kind of voodoo ritual or cornflakes. Before I let you in on this game changer, there's a couple of things that need to be said.

This is all that was added to the chicken
1 - If you always buy the rotisserie chicken because it is easy, you should know that I made this in five minutes, AND it was fresh, hot, crispy, and there is not a candle in the world that can beat the smell of roasted chicken.
2 - If you always buy boneless chicken breasts, you are cheating yourself out of: money, richness of flavor, and the juiciest chicken ever.  Unless you are working with some serious sauce, boneless breasts of chicken dry out easily.
3 - "But the large package of 'bone-in' chicken breasts is just too much for our small household."  I cooked four large breasts, but could have just as easily cooked two and frozen the others. Instead, we used the leftover chicken in a creamy chicken and wild rice soup, and chicken salad.
4 - I love fried chicken skin ... there, I said it out loud. There is a reason that some of the top restaurants are serving it even without the chicken underneath. BUT, fried chicken is not fitting into the healthy eating plan and is more of a special occasion thing. This chicken was so incredibly bronzed and crispy, it didn't feel like we were "settling" for baked chicken.
5 - Seriously...I made this in five minutes, baked a sweet potato, and steamed some broccoli in the microwave and felt like a superhero.

Ready?  GO!

CRISPY BAKED CHICKEN

4 bone-in chicken breasts
1 teaspoon salt
1/2 teaspoon pepper
1 teaspoon baking powder (Shhhh. I will explain below)
1 large grin, for wearing when you see this chicken come out of the oven.

Preheat oven to 425
Cover baking sheet in foil (saves clean up)
Put a baking rack on it (totally optional, not sure it made a difference)
Mix salt, pepper, and baking powder in a small dish
Pat chicken dry with paper towels
Sprinkle salt, pepper, and baking powder mixture onto chicken
Bake for 35-45 minutes, until a meat thermometer reads 170.

Cover baking sheet with aluminum foil (saves clean up)
I added a baking rack but am not sure that it made a big difference
Pat chicken dry and sprinkle with salt/pepper mixture.
It will not have a heavy coating.
Bake at 425 for 35-45 minutes
Now, in case you were wondering:
The baking powder draws the moisture out of the skin and is what makes it crispy!
You can't taste it at all.
Don't use baking soda, it's not the same.
You could add garlic powder, onion powder, cajun seasoning, or just about anything to the salt/pepper mix.  I kept it simple to have some versatility in how I used the leftovers.  
Nope, I didn't use any oil, at all.  
You could use any variety of bone-in, skin-on chicken for this.
You could cut the breasts in half or have your butcher do it for you.
Leftover chicken simply rocks!  

Monday, October 20, 2014

Toasted walnuts, take 2...Rosemary Toasted Walnuts.


I don't like raw walnuts.
They are good for you.
Turns out you can toast them at low heat and preserve the health benefits.
YAY!

Did I mention that my husband bought 3 lbs of raw walnuts? I made a batch of cinnamon sugared walnuts and was pretty impressed that they turned out amazingly well even at a low heat for a short time.
They turned out so well, I improvised a savory version of the recipe and here's what I came up with.

Rosemary Toasted Walnuts

1 Tablespoon salt
1 Tablespoon of fresh rosemary or 1/2 Tablespoon of dried rosemary
Pinch of red pepper flakes
Oilve oil
2 Cups raw walnuts

Heat oven to 170 degrees.
Line a baking sheet with aluminum foil or parchment paper.

Using a "beverage" blender or spice/coffee grinder, grind the salt, rosemary and red pepper flakes into a fine powder.

Salt, rosemary, red pepper flakes

Ground into a fine powder allows for better distribution
Place the walnuts into a good sized bowl.
Using a "spray" dispenser, spray the walnuts with a very light coating of olive oil, stirring to coat evenly.
Sprinkle lightly with approximately 1/3 of the salt mixture, stir to distribute the seasoning.  
Here is where it pays to taste the mixture. By grinding the salt and seasonings you will need much less than you imagine. Use what you feel enhances the taste, and reserve the remainder for other dishes. (This mix is amazing sprinkled on steamed vegetables, popcorn, and roasted chicken)

Spread the walnuts on the lined baking sheet.
Put into the oven.
Bake for 15 minutes. 
Take them out of the oven.
Enjoy the aroma while they cool.  

If you made the same "OOPS" that I did, and they are a little too salty, wait until they have cooled, and place them into a ziplock bag with a damp paper towel. Toss them around so that the paper towel picks up a good bit of the salt. Put them back into the oven for about 5 minutes to evaporate any moisture from the paper towel.

Rosemary Toasted Walnuts
Now, what to do with these besides eat them by the handfuls? Salads are getting to be more common around here.  These were a superb addition to this salad with apples, goat cheese, ham, in a light vinaigrette dressing.  


We've gone NUTS...Cinnamon Toasted Walnuts

If you follow Spoon of Hearts on Facebook, you know that after a recent vacation, my sweet husband and I have vowed to adopt a healthy eating plan and make some changes. We cook at home more than we eat out, and even though we eat fairy healthy, we are both challenged with the genetics of cholesterol and weight struggles. So, after a post vacation grocery trip, my husband came home with a 3 lb bag of raw walnuts.
The health benefits of walnuts are without question. They are thought to be helpful in cardiovascular health, weight control, inflammation, as well as metabolic syndrome. A quarter-cup serving has 113.3% of the daily recommended intake of Omega 3 fatty acids. Rather than restating all of the health benefits here, if you would like to know more, here is a link to the most comprehensive source that I found http://www.whfoods.com/genpage.php?tname=foodspice&dbid=99
This brings up 2 questions - What if you don't like the taste? What to do with 3 lbs of raw walnuts?
First ... I am not a fan of raw walnuts. Many people believe that roasting nuts negates their health benefits. It turns out that if you are going to roast walnuts, it is best to do so at a low heat. Meh. I wasn't too sure about that, until I did it. They turned out so well, I made 2 different versions.

CINNAMON SUGAR ROASTED WALNUTS

2 cups walnuts
2 Tablespoons sugar (I used demerera sugar)
Ground cinnamon to taste
Olive oil

Too many kitchen gadgets make for a crowded cottage kitchen, so I am quite selective about what things get to take up valuable space. Two things that I used for this recipe that I highly recommend for every kitchen are a small "beverage" blender and a "spray style" oil dispenser.  
The "beverage" blender for a while was always advertised on TV. You can pay a lot or a little for one, and the first one that I bought was generic, inexpensive, and came from a drugstore. Amazingly, it lasted for several years with a lot of use. We have a newer one now that came with 2 blades and 6 different plastic "cups" that screw into the blade top and have a storage top as well. Of the two blade attachments, one has tines that stick up (use this one for liquids) and the other has tines that are closer to the base (this is the one I used to this recipe, and it is more of a grinder for dry ingredients). 

Preheat the oven to 170 degrees.

Put the sugar and cinnamon into the blender/spice grinder and pulse until it becomes a fine powder.
Sugar and cinnamon ground to a fine powder
Sugar and cinnamon before grinding

The benefits of grinding the sugar and cinnamon are that it makes a little go a long way, facilitates an even distribution on the walnuts, and allows for caramelization even at low heat.

Here is where the oil "spray" dispenser comes in. We keep one filled with olive oil, and that is why I've used olive oil in this recipe. Once you have one, if you don't already, you will find that you use it more than you could imagine. The spray dispenser can be purchased at most grocery and discount stores, and is great because it gives even coverage with much less oil.  

Put the walnuts in a good sized bowl, and spray them with a light coating of oil. Stir them around and spray them once again for the best coverage. They should not look oily, and it only takes a tiny bit.  

Sprinkle approximately 1/3 of the sugar mixture over the walnuts, and stir to mix. Repeat this until you have used the entirety of the mixture. If you are watching your sugar intake, use as much as you need to get a nice coating and reserve the remainder for other dishes (it is amazing sprinkled over apples before baking).

Line a baking sheet with aluminum foil or parchment paper. If you read my earlier post about cookie baking (Homemade Oatmeal Creme Pies) it explains why I have become very partial to parchment paper, which is what I used here. Spread the coated walnuts onto the covered baking sheet.


Here comes the easy part. 
Put them in the oven.  
Set the timer for 15 minutes.  
Take them out of the oven.
Enjoy the aroma while they cool.
Store in a sealed container.
Try not to eat them all before your husband gets any ... oops, that's me. 


These are one of the most wonderful snacks I've ever tasted. They are sweet, simple, and healthy.  What else can you do with these besides eat them by the handful? Toss them over oatmeal, add them to granola, sprinkle over a salad, mix into greek yogurt, or crumble over a baked apple or pear.

Remember how I mentioned having 3 lbs of raw walnuts?  I made a savory version of this recipe with salt, rosemary, and red pepper flakes. That recipe is coming next...

Thursday, October 16, 2014

Garden Gifts and Feta Stuffed Peppers

A bushel of peppers
Having a vegetable/herb garden is all about the joy. It is pretty amazing to watch seedlings grow into lush, green, dinner-producing plants.  Don't get me wrong - there is a lot of frustration involved as well. We've had beautiful squash plants that with the onset of a few bugs are dead within days. Then again, we also have these amazing lemon peppers that grow without any help from us, and the herbs and tomatoes are plentiful. However, anything to excess is still too much.

One of the loveliest things about people who garden is their willingness to share. Realistically it is "I can't eat one more of these ________ (insert bumper crop item here), let's see if ________(name of friend or relative here) wants them."

I worked in the medical industry for 17 years and can tell you that people with an excess in their garden are angels who share with those they love ... AND their doctor's offices! Which is a great way to tell which doctors have the best bedside manner and the nicest staff -- they are the ones with a break room full of home grown vegetables and homemade cakes and pies.

Having lunch with a physician's office one day, I witnessed the greatest act of kindness I think I've probably ever seen. An elderly couple walked in with a giant pot of "stew" and a loaf of bread. They did not speak very much english, but the husband spoke for the wife and said that she had not felt well enough to cook for a long time, and that she was so happy to be in better health that she had made this pot of "stew" specifically for the doctor to say "thank you."

Now ... words are one thing, but facial expressions are another. One of the nurses opened the pot lid, and said "Wow, that smells delicious!"

I am certain that what she said was genuine.

It did smell delicious. But the surprised look on her face when peering under the pot lid was a giveaway that there was more to the story. The physician was completely gracious and thanked the elderly couple for the soup and bread, and explained that he was a vegetarian and did not eat meat, but that it was incredibly kind of them to share it. As was their intention, the couple left the soup and bread, and it did smell very good, but a peek under the lid revealed hot dogs and hardboiled eggs in a ketchup base. I am sure that doctor is one of the kindest people on this earth. I am also just as sure that he was grateful for being a vegetarian that day!

My sister-in-law just happened to have a great excess of peppers this year. I gave her and her husband some of the lemon pepper jam, so they immediately thought of me when they realized how many extra peppers they had. So ... we were gifted a bushel of banana peppers and red and green chiles. I haven't gotten to the chiles yet, but did a little research on the banana peppers and found out that it is not uncommon to have an excess of these bright yellow beauties.

Confession...I've only had them pickled. I like pickles, but there's only so many you can eat.  Apparently you can even fry the pickled ones and dip them in marinara sauce or ranch dressing. Yum.   Looking for a healthier alternative to go with some broiled grouper, I came up with these, and they were so flavorful and simple, I can't wait to make them again!

ROASTED BANANA PEPPERS WITH FETA 

Banana Peppers
Olive Oil
Feta Cheese
Greek Seasoning (Optional)

Preheat oven to 350
Cut the tops off of peppers and make a slit down the side, cleaning out the inside of seeds and ribs.
Place them into a zip lock bag and drizzle a bit of olive oil into the bag and "massage" them around until they are coated lightly with the oil.  
Place peppers on an aluminum-foil-lined baking sheet and bake for 8-10 minutes.

The peppers after baking for 8 minutes, just topped with the feta and sprinkled with greek seasoning. 

Remove from oven and top with Feta Cheese. I like the "block" feta and it works nicely to just place some slices onto the peppers. Crumbled works just as well because the peppers will have a bit of a -scoop-shaped form.  
Sprinkle with Greek seasoning and place back into the oven just until cheese is softened or even a little browned.
The finished roasted peppers...with a bay leaf from our garden.
  

I've promised to always tell you about the lessons I've learned by trial and error with each post - here is what I learned from this one:
1 - You could wrap these in bacon and fill them with a mixture of cream cheese and feta, but the simplicity of the feta and greek seasoning was tasty and much healthier.
2 - Banana peppers are not tremendously hot, but have a slow burn that tends to build. When you clean the peppers, treat them just like any other hot pepper. Wash your hands immediately after handling, and don't touch your face or eyes. It turns out that about an hour after handling the peppers, there can still be enough natural oil on your hands to burn.  

Tuesday, October 14, 2014

Amazing Queso! Dare to be deliciously different...


Heading out to a party, where everyone is to bring an appetizer - we realized that we had forgotten to purchase one of the key ingredients. Even though there is a grocery store not too far from us, we didn't have the time to make a run to the store, and prepare the food - not to mention, we had a refrigerator full of food and that is how this recipe came to be. Now, we get requests for it all the time, and it is so delicious there is never any left over.

Mexican night out has been a regular occasion for us - nothing better than getting out at the end of the day, and enjoying some delicious Mexican food with friends. Years ago, there was a restaurant that had a white cheese dip that was better than any I've ever tasted. I finally got the courage to ask what was in it and what kind of cheese they used. The answer shocked me, and is revealed in the recipe below.

The sausage used here is the reason that I can never leave the Southeast. It is made in South Alabama and is a smoked pork sausage that has the best flavor and is a southern staple. Often you will find the guys out by the grill at a party, and even though they are "supposedly" grilling something else, inevitably, there is a little Conecuh sausage on the grill that winds up being an appetizer for the drillmaster(s) and never makes it to the plate. We always have a package in the freezer, and just happened to have some leftover from breakfast. If you don't have access to Conecuh Smoked Sausage, substitute your favorite smoked sausage.  Check out Conecuh Sausage's website - they ship, and you will either thank me or cuss me for ruining your healthy eating plan with the best smoked sausage you've ever tasted.

It's not a party this time of year unless someone has made the usual hot, spicy, cheesy, meaty bowl of queso. The recipe is almost always the same, why not surprise your friends with an amazing twist on the same recipe? Be sure to save the recipe (follow us on Pinterest for the easiest way to do this) because you will find yourself making it over and over again!

CONECUH QUESO

1 lb Conecuh Smoked Sausage, diced into small pieces
1 lb Pasteurized Cheese (We used Velveeta Jalapeño)
4 oz Goat Cheese, Chèvre (Surprise!)
1/2 Cup milk (We used 2%) 


Chop the sausage into small cubes and cook over medium heat until lightly browned.  Drain on a plate lined with paper towels.  
Break up the cheeses into chunks for faster, more even melting. The small amount of Chèvre in this is the key ingredient from one of my favorite mexican restaurants, and adds a creamy richness and depth of flavor that will surprise you. 
Place all ingredients into a microwave-safe bowl.  Microwave on high for 2 minutes.  Remove from microwave and stir.  Continue to microwave in one-minute increments, stirring in between.  If mixture is too thick, add milk 2 tablespoons at a time and continue to heat until cheeses are melted and all ingredients are combined. 
If you didn't use the Velveeta Jalapeño and want to add a little spice, add some chopped pickled jalapeños to the desired level of spiciness.   
Serve with your favorite corn chips, pretzel chips, or pretzel rolls that have been sliced and toasted (we have used Sister Schubert’s Pretzel Rolls, found in the frozen food section).