Tuesday, December 22, 2015

Take a Risk...Reverse Seared Eye of Round

I almost cried.  
I was convinced that I had just ruined one large hunk of beef.  
All because I listened to an interview with Kenji López-Alt (The Food Lab) about reverse searing. Instead of searing the meat, you roast it first.  
So I roasted a lovely eye of round in the oven at 225 until it hit 130 degrees. Then broke the news to my husband that we would most likely be going out for burgers. I was pretty sure that the roast was just shy of beef jerky.  
I wasn't even willing to make side dishes until we knew that the roast was edible. 
So, I seared it. Blind to what the inside might look like, imagining the worst.  
Just to ratchet the anxiety up a notch, we let the roast "rest" for 5 minutes. (I was already contemplating which local burger joint we would be dining at, after this crazy "reverse sear" thing proved to be a hoax.)
Then, my husband sliced it...more like carved it, like a beautiful roast beef. 
I won't steal the thunder, or even try to explain the science. Just know that it is real & I immediately requested the book (The Food Lab) for Christmas. 

I doubted. 
I was wrong.  
Best. Roast. Ever.  

With some quickly smashed Yukon Gold potatoes, broccoli, & a bit of horseradish it was just shy of a prime rib dinner. 


We've also had some lovely sandwiches from the leftovers...Hubs made a mouthwatering Philly Cheesesteak today for lunch! 

Saturday, November 21, 2015

Make this now...Herbed Olive Oil


And use it through the entire holiday! Even if you are not the family "cook" these are recipes that are simple and will wow the guests at your holiday gathering. 

When you're in the Italian restaurant and eat half of a loaf of bread, because of the delicious olive oil and herbs that you have been dipping it in, do you ever think that you should just make this at home?  You should.  

Make it now. 
Then enjoy it through the holiday weekend. 
Why? 
If you make it now, you can let it sit overnight so that the flavors meld and deepen with time. 

5 phenomenal uses for herbed olive oil;

Use it as an alternative to butter for your holiday bread and rolls. 

Rub the outside of your turkey with it before roasting.  

Toss with pecans or walnuts and toast for savory spiced nuts.  

Toss with day old bread cubes and toast to make amazing croutons. 

Mix with balsamic or white wine vinegar for a savory vinegarette salad dressing. 

Plus, you get to show up with something unique and delicious for your holiday gathering! 

Enjoy! And let me know if you find other delicious uses for it!

Herbed Olive Oil
1.5 Cups Olive Oil
2Tablespoons Fresh Rosemary (1 T dried)
1 clove garlic minced or 1/4 tsp of garlic powder
1 tsp red pepper flakes
1/2 tsp black pepper

Place all ingredients into blender, pulse until combined.  (We use a small drink blender)
Add more/different seasoning as you wish. 
Pour into a jar with a tight fitting lid. 
Do not refrigerate (the olive oil with solidify)
Let stand overnight. 
The herbs will settle to the bottom and it will become clearer.  However, feel free to  stir it up and let the spices disperse throughout.


To make Savory Herbed Nuts;
Put raw nuts in a pan over low heat.
Drizzle herbed olive oil over them until they are thinly coated. 
Continue to stir them often and they are "done" when they become fragrant.  


Wednesday, November 18, 2015

Roasted Acorn Squash "Fries"...quick & delicious

I passed an acorn squash in the grocery store and realized I've never tried one.
Turns out, the recipe I chose was easy and really tasty. The cheese gets a little crispy and the squash is tender with a very mild flavor. With an oil "mister" it's even easier. You don't even have to remove the outer covering of the squash!

I'm gonna keep this brief, and go devour a pan of squash. 

Here it is...

Savory Roasted Acorn Squash "Fries"

Acorn Squash
Olive Oil in a spray "Mister"
Grated Parmesan Cheese
Seasoned Salt (Optional)

Cut squash in half lengthwise 
Scoop out seeds
Cut off ends, discard
Cut into 1/2 inch "half moons"
Place onto baking sheet (lined with parchment or aluminum foil for easy clean up)
Spray with Olive Oil
Flip over and spray opposite side
At this point you can sprinkle them with a tiny bit of seasoned salt, if you'd like.
Sprinkle with grated Parmesan cheese (We use a microplane and grate the cheese over the squash)
Bake @ 400 for 30 mins.  

Sunday, November 15, 2015

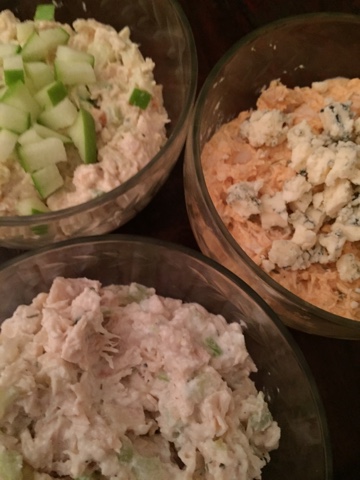
Curry Chicken Salad & Buffalo Blue Chicken Salad - Quick fix forRotisserie Chicken Salad


Just because I love to cook, doesn't mean I don't love a quick fix.  Even better when a "quick fix" meal is met with rave reviews.
Most grocers that sell rotisserie chickens, also sell really wonderful chicken salad made with the chicken. We have a local warehouse club that makes delicious chicken salad, but the large quantity often means we are bored with it before it goes bad.  Not anymore...
It turns out that with just a few simple additions you can dress up some deli rotisserie chicken salad and make people think that you are the best cook around!
The fun in cooking is all about adjusting recipes to your taste and so this is not about exact measurements, but more about inspiration and ideas. 

Curried Chicken Salad
1.5 Cups Rotisserie Chicken Salad 
Add 
2 tsp curry powder
2 T Sweet Relish (I used some pear relish from my sweet Mother in Law)
Handful of toasted nuts, chopped (Almonds, Pecans, Cashews, etc)
Finely Chopped Apple OR Raisins, OR Grapes (I really like using 1/2 of a Granmy Smith Apple)

Combine all ingredients and mix well.  Adjust ingredients to your taste. 
*If the chicken salad is a bit dry, you can add additional Mayonaise, or even better a bit of Greek Yogurt.  


Buffalo Blue Chicken Salad
1.5 Cups Rotisserie Chicken Salad
Add
2 Tablespoons of Buffalo Wing Sauce or "Red Hot" Hot sauce. 
Mix well. 
Garnish with Blue Cheese Crumbles. 
Feeling indulgent? Stir a bit of finely chopped bacon into the chicken mixture.


That's it...plain and simple.  A large container of Rotisserie Chicken salad will allow for both recipes with some "plain" left over to make a nice trio. We enjoyed ours for dinner with some apple slices, crackers, and celery for dipping.  

Bring these to your next party and people will swear that you worked TOO hard. Your secret is safe with me! 


Sunday, October 11, 2015

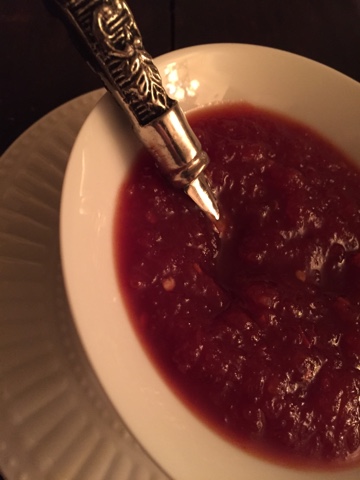
Now With Video! We are Jammin', Tomato Jam


QUICK - LOOK! Did you see? There's a video at the top of the page! The first one...EVER!  I have spent the day watching my fabulous husband put it together and just amazed at how beautifully it came out. He is truly amazing (not to mention, smart, patient, kind, and funny) and somehow he not only puts up with me photographing almost every morsel of food that we cook/eat, he magically whips them up into this fun video.  So - enjoy the video, and try your hand at a little "Tomato Jam"!

What do you do with Tomato Jam? Paint a little on grilled chicken or pork (even a rotisserie chicken) and all of the sudden you have a gourmet level dish that will impress even the fanciest of guests.  Serve it over a block of cream cheese, or Chèvre (goat cheese) or a mixture of the two and it makes a beautiful appetizer in a matter of minutes. Actually, one night, we made a really simple pot roast & vegetables in the slow cooker and served the tomato jam on the side and it was a big hit.

I can't wait to hear what you think of the video & what kind of delicious ways you find to use this ruby gem of a jam!

Tomato Jam
6 cups tomato cored & chopped
2 onions chopped
1 clove garlic, minced
1 T Fresh ginger, grated
1 T Red Pepper Flakes
1 T Salt
1 cup brown sugar
1 cup white sugar
1 cup cider vinegar 
Zest of 1 lemon
Juice of 1 lemon

In a large pot, add the first 9 ingredients.
Cook over medium high heat, stirring often until reduced by 1/2 (about 20 minutes).


Reduce heat to low & cook 2 minutes more. 
Keep refrigerated in tightly sealed container for up to several weeks. 


Here are some suggestions to customize your tomato jam;

- Instead of the red pepper flakes, use a small, fresh jalapeño ribbed, seeded, finely chopped.
- Don't have fresh ginger? Use dried, but cut the amount by half.  Or use pickled ginger, often found in the Asian section of your grocery. Mince it finely. 
- Did yours come out too chunky? Run the immersion blender through it just a little bit. Or, put 1/2 - 3/4 of it in a blender or food processor and pulse it, just a little bit...otherwise it will turn into ketchup!  
- Speaking of ketchup, you can turn this into a fabulous homemade ketchup by using the immersion blender or a regular blender to blend until smooth and cook down a bit further.  
- Add a bit of liquid smoke flavoring and the jam becomes an amazing barbecue-like sauce that is wonderful with grilled meats.  
- Need a quick appetizer?  Serve over a soft cheese like Chèvre (goat) or cream cheese for a sweet & savory nosh.  
- Can it!  Place in sterilized glass jars and can it according to preservation standards & have wonderful holiday gifts!

Psssst...Did I mention that we now have video? WOO! (Don't judge me, I'm beyond excited!)

Sunday, October 4, 2015

Monkeying Around with Monkey Bread

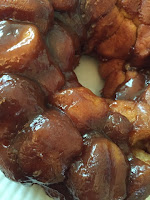
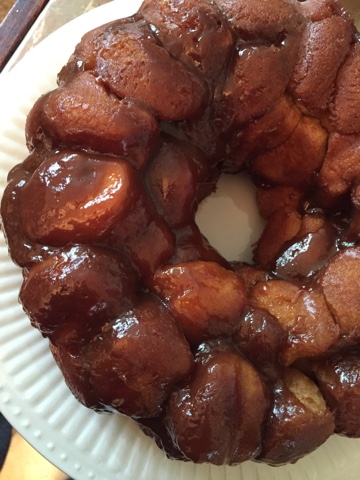
When developing a recipe, I look at several different recipes and make a combination of them all.  I did this today with a combination of several different monkey bread recipes to find an easy way to replicate one I had as a child.  I remembered the butterscotch pudding addition and how rich and sweet it tasted.  The pudding adds a great balance to the cinnamon flavor and accents the butter flavor. It also makes the texture much smoother & creamier than most monkey bread. This is not the final recipe, but more about the process and what I will include and exclude as I continue to experiment.  (It's tough, but my taste testers haven't complained yet)
So, here's what I learned...

1. The BREAD.  There are 2 popular ways to truly do this. Canned biscuits, or frozen yeast roll dough.  Biscuits are faster and don't require pre work.  Frozen yeast roll dough is richer and is great for premaking the night before.  
I used canned biscuits for this one and turns out that the 4 pack of 7.4 oz cans was just right to fit in a bundt pan.  
I pulled each small biscuit into 2 pieces and then rolled it in the sugar mixture.


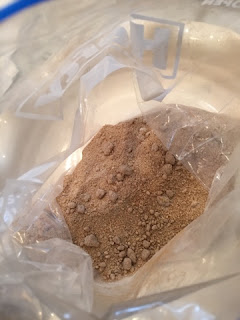
2. The Sugar Mixture. I used 1 cup of brown sugar, 2 tsp cinnamon, 1 package butterscotch pudding mix.  Mixed all of these together in a plastic bag & dropped each of the dough balls into it before placing into a greased tube pan.


3. The Glaze.  Mix remaining sugar mixture with 1 cup melted butter and 2 T of milk.  Pour over sugar covered dough in tube pan.  


THE LESSONS. Again, don't use instant pudding mix, it makes it gummy.  Increase the milk for better coverage.  Layer the glaze & dough in the tube pan to make sure glaze gets all the way to bottom (which becomes the top when inverted onto plate). 


4. Baking.  Baked at 350 for 30 mins which was perfect.  Let cool for about 5 mins and invert onto serving plate.

So, the recipe is technically in the notes above.  But, realistically I think you could add a box of butterscotch pudding (not instant) to your favorite recipe and it would work.  Next time, I will be using slow cook pudding, frozen roll dough, layering, and who knows, I might just go nuts and add nuts!

Tuesday, September 22, 2015

Pumpkin Spiced Creamer - Perfected!


I am the child of a scientist and never realized the impact that it has on my every day activities. Cooking is my favorite scientific outlet, because there is always a way to change it up and sometimes it is wonderful, and sometimes it is just a learning experience.  In the words of my sweet husband, there is no failure, only feedback.
Last year, in the true fall spirit of Pumpkin Spice-A-Palooza, I posted the recipe for Pumpkin Spiced Creamer.  It is one of the most wonderful uses for the Pumpkin Spice and saved a bunch of money on pumpkin spiced lattes!
I hope that you don't find this crazy, but PUMPKIN SPICE IS NOT REALLY ABOUT THE PUMPKIN.  There, I said it, and it is true.  Pumpkin spice is the essence of all of the beautiful autumnal pumpkin baked goods that celebrate the richness of fall.
Now, that I've explained why, I will simply say this - I made this recipe and left the pumpkin out completely.
How was it?
SPLENDID! Didn't miss the pumpkin at all.
So - I'm reposting the recipe, and challenge you to be your own kind of kitchen scientist.  Use this recipe as a guideline and experiment to your heart's content!

Click the link below for the recipe
http://www.spoonofhearts.com/2014/09/pumpkin-spiced-coffee-cream-homemade.html


Sunday, September 20, 2015

Going Bananas for Banana Chocolate Chip Blondies

So...
It has been a tough day for football in the south.
Baking can be very zen for me. 
So I opted to creatively deal with the brown bananas in the kitchen rather than being exasperated at a television.  
I know that banana bread is what you are "supposed" to make, but it was time for a  change. 
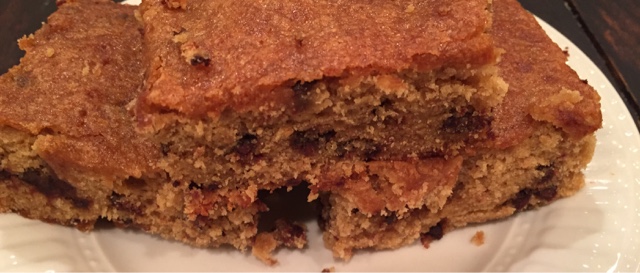
These are rich and chocolatey and by the time they were done, games were played and lost and we were happily enjoying these decadent treats and almost forgot about football for a while...almost.

          Banana Chocolate Chip Blondies
1 cup Butter (2 sticks) Melted
2 cups brown sugar
1 1/2 tsp Vanilla
2 Eggs
1/4 tsp Salt
2 cups Flour
1 tsp Baking Powder
1 cup Banana, mashed (4 small bananas)
1/2 bag of mini chocolate chips

Preheat oven to 350
Melt the butter (you can brown it if you are fancy). I used a medium ceramic mixing bowl and just melted it in the microwave. 
In a mixing bowl, combine the melted butter and sugar. Stirring until well incorporated. 
Add the eggs and vanilla to the sugar mixture, stir until combined. 

Add in the flour, salt, & baking powder incrementally and continue to stir.
Lastly, add in the mashed banana and chocolate chips and stir until all ingredients are combined.  
Spray a 13 x 9 pan with non stick spray and pour in the batter, spreading evenly throughout the pan. 

Bake 35-38 minutes until center is set.  

Notes: This recipe could easily be halved and prepared in an 8 x 8 pan. 
These are thick and rich and unbelievably moist.  If you want to lighten them up a bit, use a 1:1 ratio of white sugar to brown sugar.  
The amount of baking powder is intentionally small and can actually be omitted for a denser brownie.  
I used half a bag of mini semi sweet chocolate chips which was delicious and the minis seem to disperse evenly in the batter. Often when I don't have chips in the house I substitute a chopped chocolate bar.  

I hope that you enjoy this delicious alternative to banana bread, and your family and friends are amazed at your baking skills! 


Friday, September 11, 2015

Celebrating Every Day - Chicken Piccata in Lemon Butter Caper Sauce

It's the anniversary of the day my husband and I met, and I never expected to find the most perfect love that I never knew existed. Turns out, it is also the anniversary of 9/11/01. This day represents the best and the worst of times, but oddly it is also the reminder that you never know what tomorrow may hold. Live well and celebrate each precious moment.
So in celebration of this day, we are making a beautiful chicken piccata with lemon-butter-caper sauce. Even if it weren't a special day, this recipe is one worth celebrating. 
Now, I am going to let you in on a little secret. I have read so much about how hard it is to feed a family on a budget or to eat well and not spend a fortune. So, I've made a concerted attempt to keep track of just how "expensive" my recipes are and bring you a way to have amazing dinners without breaking the bank. 
Ready for the gourmet price tag? $2.50 per serving, for 4 servings.  That is the chicken, the potatoes, and the broccoli. 
Don't get me wrong, I didn't go to the most expensive grocer in town, but even at the highest prices, it doesn't add much more. Shopping is a completely new topic that I will cover on another post, because this is all about the chicken.  

Chicken Piccata with Lemon Butter Caper Sauce

2 T Olive Oil
1/2 Cup Flour
1 T corn Starch
2 boneless skinless chicken breasts
1/2 Cup dry white wine
1/3 cup lemon juice
3 T butter (divided)
1 large plastic bag (I used a zipper seal freezer bag)

In a flat dish, mix together the flour and cornstarch (Cornstarch helps to lighten up the flour coating). Season with salt and pepper. 


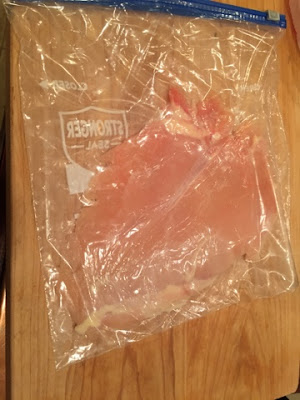
Put one chicken breast in the plastic bag and place on a solid surface. Using a meat mallet or the bottom of a pan (I use a small iron skillet), pound the chicken until it is uniformly about 1/2 inch thick. Repeat with remaining chicken breast. (This is awesome if you have some stress you need to work out. If you are not stress free by the time you have finished preparing the chicken, there's bound to be a bit of leftover wine!)


Put the olive oil in a skillet and heat to medium. 

Dredge the chicken through the flour mixture so that it is completely but lightly covered.  (If this were truly "fried" chicken there would be a beaten egg bath alternated with the flour mixture). 

Cook the chicken in the pan with the hot oil about 5 minutes on each side until golden brown and juices run clear.  
(If you want to keep the chicken warm while you make the sauce, let it sit in a warm oven)


Wipe out the skillet with a paper towel and return to the stove, reducing the heat to medium low.  

Add 1 T of butter, the lemon juice, and white wine to the pan.  If you are using fresh lemon juice, put the lemon peel in the pan for extra lemon flavor.  Season with salt and pepper (I also like to add a little garlic here). 


Stir until the lemon butter mixture is combined and allow it to "reduce" or "cook down." The sauce will thicken and take on a pale yellow color. 

Here's the coolest trick ever, turn the heat off or to the lowest it will go and add the last 2 T of butter (sliced into pats) and just swirl it around until combined.  This incorporates the butter into the sauce and gives it a creamy, glossy, gorgeous texture. 


Plate the chicken, drizzle the sauce over it, and sprinkle with capers. 


Mashed potatoes have never had a better pairing than this lemony chicken. It could also be paired with steamed pasta tossed with a bit of butter, olive oil, and garlic.  We also added fresh broccoli that we simply steamed in the microwave. 

The only regret at the end of dinner was that we had not doubled the recipe for sauce, because it was delicious on the broccoli and mashed potatoes. Two large chicken breasts made enough for 4 servings, which means that leftover lunch tomorrow is something to celebrate as well!  


Wednesday, June 17, 2015

Asian Noodle Bowl with a Sweet Southern Flair


One of the gifts that I am most proud of is finding a guitar teacher for my husband.  He actually loves the theory and the rules of playing and is really enjoying the instructor/consultant I found as his Christmas gift. When he first started, he would go for lessons on Saturday morning, and was usually wedged in between the kid who didn't want to be there, and the kid who really wanted to be there but had not practiced.  All of this to say, one Saturday morning on his way home from guitar lessons, sweet hubs decided to go peruse our local asian market.  It is a great one, by the way.  We tell all our friends about it and often take out of town visitors there to eat.  They have an ENTIRE AISLE OF NOODLES! Simply put, it's awe inspiring.  He bought a sampling of several kinds of noodles, fresh, frozen, dried, Soba, ramen, lo mein, etc.  So we have been trying each of them in several ways, and I wish I could tell you a favorite, nope.  They are ALL good.
I started making noodle bowls a few months ago and really love the simplicity and endless possibilities as to what you can add. I saw someone add an egg to the boiling noodles and watched it poach in the water as the noodles cook (best with fresh/frozen noodles that cook quickly) until it was the perfect little pearl in the sea of broth and noodles!
I will keep this short and sweet, and you're gonna be amazed at how easy it really can be!

NOODLE BOWLS
2 boullion cubes (Good ones, I use Knorr low sodium)
4 cups water
Corn (We  had leftover from roasted corn from the weekend)
1.5 Cups of chicken cubed (This is great for a rotisserie chicken)
Asian Noodles - look for the ones that are soft or frozen, (a trip to the asian grocery is fun, but not necessary - you can find these at your local grocery)
2 Eggs
Chinese 5 spice, just a dash (optional)
Toppings - Scallion, Cilantro, Sprouts, Sriracha, Jalapeno, Avacado - what every makes you happy!

In just one pot, bring the water and boullion to a boil with a dash of the Chinese 5 spice  (if you are a purist, use chicken stock and season it) add in the corn, chicken, and noodles. Let it return to a slow boil and carefully break 2 eggs into the boiling mixture then put the lid on the pot and remove from heat when eggs poach and look opaque.  
NOW for the fun part - building the bowl!  
Transfer the noodles to 2 large bowls, then the eggs, then pour over the broth, corn, chicken mixture.  
I love mine topped with Scallions, Cilantro, Spicy Sprouts, and Jalapeño.  
Helpful hint - if you like your "soup" a little thick, while it is boiling, mix 2 tsp corn starch into 2 T water making  a "slurry" and pour into boiling pot.  Stir.  
This can be modified to suit all kinds of items you have in your fridge on any given day!
I'd love to hear how you made it your own!

Sunday, June 14, 2015

Fantastic Fresh Fruit Shrubs

When I first heard someone discussing "shrubs", I immediately thought of a plant. It turns out that it's not even close. Here's the quick rundown of the history of the shrub. In times where refrigeration was not common and markets were not as plentiful fresh fruit was only available for limited seasons. At the end of the season, to preserve and utilize all of the fruit, people would often make drinking vinegar - or shrubs. Now that we are in the era of the hipster and craft cocktail renaissance, they have come back into vogue. The best part is that there are lots of uses for shrubs, and for those that are drinking a little bit of cider vinegar every day for the health benefits - a shrub is a delicious way to do that. They can also be combined with olive oil for a wonderful summer salad dressing, or added to water or soda for drinking. There are a great many classic cocktail recipes around that call for shrubs, and now you will know how to make your own!
When researching how to make shrubs, I found several methods. You can combine the fruit and sugar and cook it, strain it, and add the vinegar.  Or you can use the cold method that I will detail below and it really makes the fruit flavors brighter. Also - this is a great way to use fruit that is a little too ripe, or as in the strawberry one I made, use the tops (even the green part!) that you would ordinarily just discard.
FRESH FRUIT SHRUB
1 Cup Fresh Fruit (I made 4 batches; Strawberry, Cherry, Peach, & Blueberry/Basil)
1 Cup of Sugar 
1 Cup Cider Vinegar
Time

Yep, that's it.  
Cut up the fresh fruit, it doesn't have to be pretty, fancy, or even peeled.
Put it into a large jar with the sugar.
At this point you can mash it, or just put the lid on it and shake it.
Put in the refrigerator for 3-4 days
The sugar will break down the fruit and become a syrup
After it has had time to break down, put the syrup and fruit through a fine sieve into a large measuring cup. I used a wooden "muddler" to press out all of the syrup, but you could just as easily use a wooden spoon.
Once you have collected all of the syrup, add 1 cup of cider vinegar for every one cup of fruit, and stir.
Place into jars or bottles and keep in a cool dry place or refrigerate for longer lasting results.
Although they are amazingly tasty at this point, it is good to let the flavors "marry" by letting them sit for another 24 hours at least. 
Be adventurous! I added basil to the blueberry one and think it may very well be  my favorite.  Next up is Plum Rosemary.   
At the moment, I've mixed the peach one with a bit of soda water and ice and it is delicious and refreshing. I can't wait to use them in dressings, marinades, and even a classic cocktail or two!
From left to right; Blueberry Basil, Cherry, Strawberry, and Peach Shrubs